After Deployment on Power Apps Portal, if you encounter issues and want to turn off access to all users while we investigate the real deployment or development issue then following are quick steps for this.
Firstly, Go to Power Apps Portal and then select relevant Power Apps Portal and Right Click and then select Settings Options
Power Apps Portal : Settings
Once Portal Settings Opens click on Admiration Link and on Power Apps Portal Admin Centre , Change Portal Stage to Off and Click on Update Button as Shown below..
Once this is done, none of user will be able to access the Power Apps Portal (refer screen print below)
Once the real issue is fixed and deployed, you can Switch Portal State to On and all users will be able to access Power Apps Portal Again!
If you want to check access or licence of any user with in power platform or dynamics 365, please use Access Check Tool, using this you can validate user permissions for specific app(s),
You can open access check tool, by putting following URL in the browser.
then enter user email address or user id in search box and press search and system will show all the apps user have access to and licence for each app in relevant power platform environment.
This tool can only be accessed if you are system administrator or system customizer on relevant power platform environment.
I have been used to using Advanced find (now can be referred as Legacy Advanced find screen) since 2005 and this screen is/was pretty much back bone of dynamics system since first release of dynamics.
For creating new view, click on Data-verse Search box and click on “Search for rows in a table using Advanced filters” link
D365 Creating a New view
On next screen select relevant table.
This table list is limited to only the ones specified with in Model Driven App so this is major change as currently in legacy Advanced find screen user can search on any tables they can access based on their Permission.
select Table for View
Once selected relevant Table and then on next screen Create relevant filter and click on Apply
View Filter
After this, click on Save as new view and on next screen give relevant view name for this.
Saving New View
After clicking on Save, new Personnel view will be created against this table.
Amend Existing view
To amend existing personnel view, select relevant view and select Edit Columns (to Add/ Remove columns) or Edit Filter (to change view criteria)
Amend Existing View
Delete/Hide or Change View Name
Click on “Manage and share views” link which will allow user to Edit view name, user can hide and delete not requirement view as well from this screen.
Delete/Hide View
This allows configure sorting of views as well.
If as an Administrator if you want to apply this settings for multiple user then use XRMToolbox Plug-in called “User Views Display Settings” for this (refer screen print below)
XrmToolBox
Note: –
Even though after enabling Modern Advanced Find, Legacy Advanced Find icon is not longer visible but if some user still wants to access, they can access via following URL. (Replace CRMURL and APPID for your relevant environment)
When working on cloud flow, just realized that once cloud flow create you can not change owner after creation on power platform.
We had cloud flow for which we want to change current owner.
Image 1: Sample Flow screen
While trying to change the owner, clicking on the Edit screen takes us to the next screen where we can add a new owner, but we cannot amend the original owner.
Image 2: Sample Flow Owner screen
Resolution
If you can log in to relevant data-verse (dynamics 365) Environment and do advanced find and search for relevant processes.
Once you locate the relevant process (i.e. flow) and then from this screen you can assign to a different owner. (ensure you assign to owner which got correct permissions)
Image 3: Advanced Find screen
Note: – Remember this only changes owner if there are relevant connection references then they needs to be manually updated..
Recently we had a scenario where we had to create an auto number field on an existing table (or entity) in data verse.
so when you create a new auto number field all existing records will have this field value as Null and will not be populated.
To resolve this issue, I have created the following new XrmToolBox Tool called “AutoNumberUpdater”.
To Install this toll, open XrmToolBox Tool Library and selected “AutoNumberUpdater” and then press Install
XrmToolBox: Tool Library
Once installed, open this tool and connect to the relevant data version environment.
Following are brief steps on how to use this tool.
XrmToolBox : AutoNumberUpdater
Step 1: Select Solution from the solution dropdown
Step 2: After Solution is selected, the system will show you all entities which are in the currently selected solution so pick the relevant entity (or table) where the auto number column resides.
Step 3: Once Entity is selected, it will populate all available auto number attributes (or fields) in the attribute dropdown list. Selected relevant attributes for which data needs to be populated.
Step 4: once attribute is selected, system will show auto number format in Next number field and also enabled “Fix Auto Numbers” Button
Step 5: Once you are ready to update data, press “Fix Auto Numbers” Button which will show a running log of records as shown in screen prints below.
XrmToolBox : AutoNumberUpdater : Running Log
I hope this helps…
Notes: –
This is tool inspired from already existing tool called Auto Number Managed by Jonas Rapp (https://jonasr.app/) which allow you to create new auto number field on dynamics 365 (or data-verse) table
Dynamics: Setting up Owner to display only teams related to logged on user
By default, dynamics model driven app Form owner field displays all users and teams and this post we will write JavaScript code for specific entity (table) to ensure users can only pick teams (where current logged on user is a member of the team)
Step 1: Firstly, there is already existing view called “My Owner Teams”, which displays all teams related to logged on user, so we will do advanced find for this view and find id of this view which will be using in next step.
select view which needs to be set as default view
After creating this view download FetchXML and note down view id for this, if you have specific requirement then create new public view and use that record id in next step.
Step 2: Now we will create new web resource which will filter our owner field on model driven table form to only display teams which are related to logged on user.
For this we will create new java script web resource as shown in screen print below.
new web resource
And following is code that we will put in this JavaScript file.
And then configure onload event as shown in screen print below.
After doing this configuration, save and publish form changes..
Step 4: Ensure relevant team got correct security role and permission assigned other wise user might see following error message.
The selected team does not have sufficient privileges for this action. Assign a security role with the required privileges to this team, and then try again.
Step 5: Finally, after doing all above changes verify the changes working as expected …
I wanted to create new Entity in Dynamics online Model Driven App, so I create new table using new interface but looks like there is no option for table to enabled for Business process flow there…
Following are all the options available in new interface and enabling business process flow is not available in list for new interface.
PowerApps Creating New Table options
For the time being, I switched to Classic interface and enabled Business process flow for my custom entity.
Switching to Classic InterfaceClassic interface has this option enable, Save and publish changes
I guess MS will be including this option in new interface at some point in future!
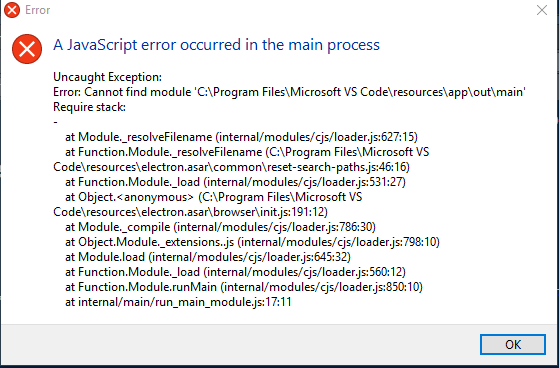
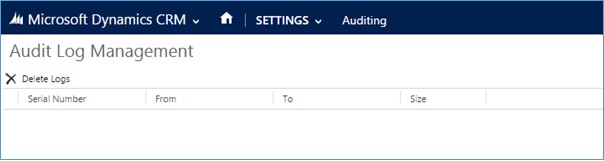
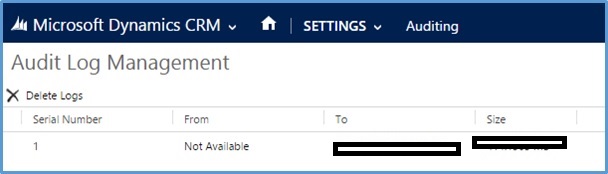
So on MS CRM Audit Log screen we could not see any partition details available even though (as shown in screen print below) even though we are using enterprise version of SQL.
We also realized that our audit table grown very large and was started impacting performance as well, during investigation it is revealed that MS CRM organization was created from back up which was taken from standard SQL version.
So when new organization import process run then CRM system did not created these partition so we contacted Microsoft support and they provided following SQL script for this.
After running script we started seeing CRM Audit partition in the system now.
CRM AUDIT: SQL enterprise to standard version
if your requirement is other way around so your current CRM SQL DB is enterprise version and if you want to migrate to standard SQL version then follow the steps provided in this KB article to restore DB and then after this perform normal import organization operation in CRM for this.