Tag Archives: CRM 4.0

Filtering Lookup Data in CRM 4.0

Following are the some options (supported and unsupported) in implement filer in CRM 4.0 entity form for any lookup fields.

Option 1: Change lookupsingle.aspx file (Unsupported)

George Doubinski explains full steps in his blog at Here

Option 2: Buy Stunware Filtered Lookup Add on for CRM

If you looking for truly global solution which is embedded in CRM for this then this would be best fit answer for this requirement.

Please check out full details at their website.

Option 3: Using java script and entity changes

This option requires you to do some entity changes and also put relevant java script code in CRM on load event.
Let’s understand this with one example, Case Form got account and contact look up. When ever user select particular account then while looking up contact only contacts record that belongs to selected account should get displayed, (i.e. contacts look up filtered based on account selected).
Now following steps to achieve this functionality using this Option

Step 1: (Entity Change)

Change the contact search field names in Contact Lookup view and Quick Find view (i.e. add parentcustomerid as searchable field in these view and publish the entity)

Step 2: (Java Script on Entity Form on Load)

Above screen print displays base code for this, before using relevant field name should get changed and then put in relevant CRM Form On Load Event.

Hope this helps!!

Cheers,
MayankP

Check Dynamics CRM Version

This question is one of the most frequently asked questions by CRM developers/administrators.

Following are few different ways to get this information for Dynamic CRM.

Option 1: Add or Remove Programs

Go to Control Panel and click Add or Remove Programs
Select Show updates and this will show relevant roll up details as mentioned in the following figure.
This is client side screen print and for the server you need to go on to server and check same thing in Add or Remove Programs.

Option 2: Using CRM about US Dialog box

Go to Outlook and Click on “CRM” button in CRM outlook Toolbar and it will displays the client (outlook) and Server roll up number of CRM system as shown in screen print below.

Option 3: Checking Database Table

Run following query against relevant CRM database and query result will details relevant installed version for CRM system.

Also check following is a list of CRM rollups and their release info, match the details (i.e. Version number) got through above option and you will know which roll up is installed on your CRM system easily.

Version Build
RTM 4.0. 7333.3
Rollup 1 4.0.7333.1113
Rollup 2 4.0.7333.1312, 4.0.7333.1316
Rollup 3 4.0.7333.1408
Rollup 4 4.0.7333.1551
Rollup 5 4.0.7333.1644, 4.0.7333.1645
Rollup 6 4.0.7333.1750
Rollup 7 4.0.7333.2138
Rollup 8 4.0.7333.2542
Rollup 9 4.0.7333.2644

Cheers,
MayankP 🙂

Exporting more than 10,000 records to Excel in CRM 3.0/CRM 4.0

CRM 3.0

When you export records from CRM 3.0 to Microsoft Excel only the first 10,000 rows are exported. Unless you scroll to the end of the spreadsheet there isn’t any kind of indication that a limit has been reached. The following post from Microsoft walks you through the steps necessary to increase the limit.

http://support.microsoft.com/kb/911395

CRM 4.0

To change this in CRM 4.0:
1. Log-in to the SQL Server where the _MSCRM database is stored
2. Open the OrganizationBase table
3. FInd the Column: MaxRecordsForExportToExcel
4. Change the value from 10,000 to the desired value
5. Committ the change to the database

Send the failed email again in Dynamics CRM

Sometimes because of various reason email created and send from CRM 4.0 fails to reach the destination and in this case CRM changes the email status to “Failed”
If you want to resend the email then you can easily do this using some simple workflow and then manually running this against the relevant emails. Following are the steps for the same..

Step 1: Go to Settings -> workflow – > click New

Step 2: Enter Workflow name “Send Failed email again” and then select entity as Email

Step 3: Remove/Deselect option to start this “Record is created” and select the option to run this on Demand as follows

im

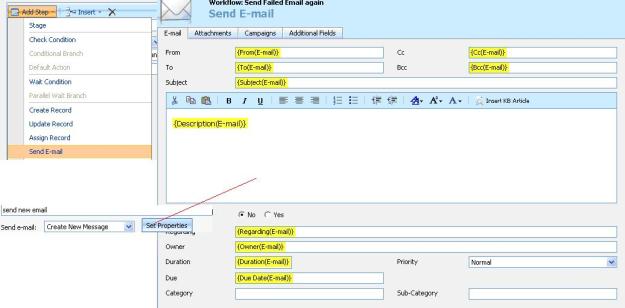
Step 4: Now add step to send email as follows

mj

Step 5: Now add steps to change the status of original email from failed to cancel so it does not pick up again. Finally publish the workflow

Step 6: select the relevant email with status “failed” and click run workflow button and select the workflow created in above step.

Done !!

CRM 4.0 Java Script “Error: Access is denied”

If you have written Fetch Xml code using Java script then there would be case when specific user will get the following error

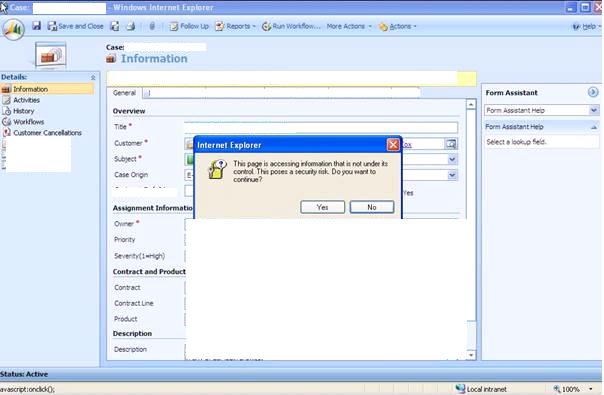
“This page is accessing information that is not under its control. Thos poses a security risk. Do you want to continue?

Case Page

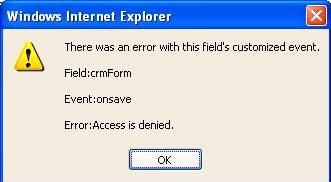
And then if user continues it gets following error

Case Page

Potential Solution:
 Click on Tools in the Internet Explorer tool bar menu and
 Then select Internet Options from the drop down.
 Now click the Security tab and then click the “Custom Level” button.
 Once this is open scroll down until you see the “Access data sources across domains” setting and set the radial button to enable.
 Click the OK button followed by the Apply button to save the settings

Hope this helps

Perform Action for 1:N and N:N Relationship in CRM 4.0 workflow editor

currently CRM 4.0 workflow editor allow you to update relevant record with N:1 relationship only, for example if you are in case screen then you can update related Account/Contact record only but if you want to update all tasks related to Case then you cannot able do it currently in Out of the box system.

Just came across this new project on codeplex which provides custom workflow which you can just register and this will extend (or add new action sub menu) in workflow editor screen to allow performing action for 1:N and N:N Relationship.

Following is the details from the CodePlex Site

Project Description
This plug-n allows to execute a workflow for each entity that has a 1:N or N:N relationship to a given entity.
For example: execute a workflow for each case related to an account (1:N), or for each competitor related to an opportunity (N:N), etc.

Summary
With CRM 4.0 out-of-the-box it is possible to perform actions on entities that have a N:1 relationship to a given entity, For example from an opportunity it is possible to update or run a workflow on the parent customer.

This plug-in allows to extend this to the other two possible relationships: 1:N and N:N. With the aid of this plugin it is possible to perform an action on each opportunity given the parent customer (1:N) or on each competitor given the opportunity (N:N) or on each opportunity given the competitor (other way of the same N:N).

Installation
Copy the .dll to the Microsoft Dynamics CRM\Server\bin\assembly folder
Run the Plug-in Registration tool and register the .dll
If the plug-in was registered successfully, a new action sub-menu (Utilities) will be available when selecting a workflow action.

Download Project documentation and files : http://crm40distributewf.codeplex.com/

Adding Case Resolution status

One of the common question or thing that people get missed is that how to add more “resolution status for Case (incident)” or more “Lost Reason on Opportunity (opportunity)” Record.
We look at the example steps for case record and all other entities status list can be changed similarly.
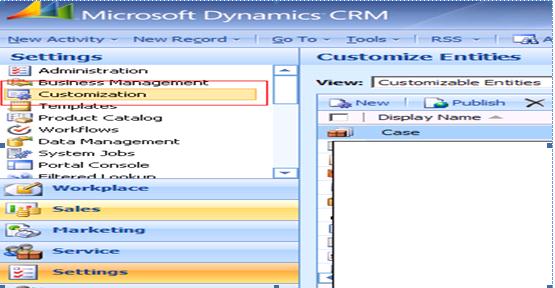
Step 1: Go to Settings – > Customization – > Customizable Settings -> Open Case Form
Case
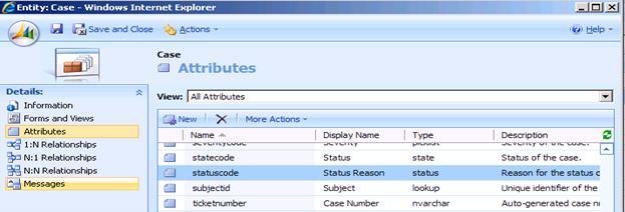
Step 2: Go to attributes -> Open statuscode attribute
Case
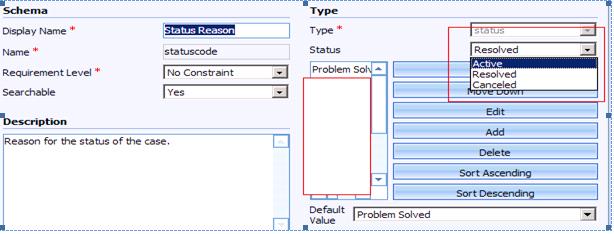
Step 3: Select relevant state and then add relevant status reason in this drop down list
Case
Step 4: save the changes and publish the entity.

Adding Email Signatures in CRM 4.0

I had a good question from one of the CRM users recently and thought I’d share the answer with you all….

Do you ever send email’s out through CRM and wonder how you can add your Signature to them, like it does in Outlook?

There is a way to do it, but first you need to create a template for your signature to go into.  

1. In outlook or on the Web version, go to Settings -> Templates à Email Templates

image

2. Create a New Template – Choose Global template

image

3. Add your signature into the text box on the template

image

4. Now… When you write an email to a contact or Account, type the subject, and body text as usuall. Before sending – click  Insert Template to insert your signature

image

 5.Select your signature template that you created and click OK

image

 6. Click Cancel when it asks to replace your Mail subject with the template Subject

image

DONE – Your email now contains your signature. You can simply add this template into all the mails you send from CRM. You can also make any number of different template if you have standard text that you would like to insert into a mail.